Looking for a fun and creative way to recycle old tin cans? Enter decoupage—a simple yet stunning craft technique that lets you transform everyday objects into beautiful decor pieces. Whether you're a seasoned crafter or a beginner looking for an easy DIY project, this guide will show you how to make decoupage tin cans that are both stylish and sustainable.
By upcycling tin cans, you’re not only reducing waste but also creating unique and personalized home decor. With just a few materials like decorative paper, glue, and a little creativity, you can turn empty cans into gorgeous organizers, planters, lanterns, or even gift holders. Let’s dive into this eco-friendly DIY project!
Materials & Tools Needed
Before we start, gather the following supplies:
Empty tin cans (washed and dried)
Decoupage paper or napkins (scrapbook paper, magazine cutouts, or tissue paper work too!)
white acrylic paint
Mod Podge or decoupage glue
Acrylic paint (optional, for base coat)
Foam brush or paintbrush
Scissors or craft knife
Sandpaper (for smoothing rough edges)
Sealer or varnish (for a durable finish)
Decorative elements (ribbons, lace, beads, etc.)
Step-by-Step Guide to Decoupaging Tin Cans
Step 1: Prep Your Tin Can
Remove any labels and adhesive residue.
Wash and dry the can thoroughly.
Sand the edges if they’re sharp.
Apply a base coat of acrylic paint if needed and let it dry,
so that the color of the can does not show through the napkin, it is good to paint them with white paint, it will give them a more professional look.
After painting the cans, leave them until the paint dries completely
Step 2: Cut and Arrange Your Paper
Measure the height and circumference of your tin can.
Cut your decorative paper to fit around the can.
Experiment with different layouts before gluing.
Separate the napkin to use only the patterned part
Step 3: Apply the Decoupage Glue
Use a foam or brush to apply a thin layer of Mod Podge onto the can.
Carefully place the paper and smooth out wrinkles with your fingers ,leave to dry
Apply another thin layer of glue over the top to seal the paper.
Step 4: Let It Dry and Seal the Design
Allow the first coat to dry completely.
Add additional layers of glue for a stronger seal.
Finish with a waterproof sealer for durability.
Optionally
Glue large beads to the bottom with hot glue.
Creative Decoupage Design Ideas
Not sure how to decorate your tin cans? Try these ideas:
Vintage Floral: Use old book pages or floral napkins for a shabby-chic look.
Minimalist Modern: Opt for neutral colors and geometric patterns.
Seasonal Themes: Create festive cans for Christmas, Halloween, or Easter.
Personalized Designs: Add names, quotes, or monograms for a custom touch.
Tips and Tricks for a Perfect Finish
Use a credit card or squeegee to remove air bubbles.
If the paper tears, layer smaller pieces over the top for a textured look.
Avoid overloading with glue—it can cause wrinkles.
Apply a clear acrylic sealer to make your design last longer.
Using Decoupaged Tin Cans in Home Decor
Your finished tin cans can be used in countless ways around the house:
Planters: Perfect for succulents and small herbs.
Desk Organizers: Store pens, pencils, or craft supplies.
Lanterns: Punch small holes and add tea lights for a glowing effect.
Kitchen Storage: Keep utensils, spices, or tea bags in style.
Common Mistakes & How to Fix Them
Glue Stains: Wipe excess glue immediately with a damp cloth.
Paper Wrinkles: Gently smooth out before the glue dries.
Edges Peeling Off: Apply an extra coat of glue to reinforce.
FAQs About Decoupage on Tin Cans
Can I use any type of paper?
Yes! Napkins, tissue paper, wrapping paper, or old book pages work well.
How do I make it last longer?
Seal with a waterproof varnish to prevent wear and tear.
Can I paint over decoupage?
Yes, but use a light acrylic wash for a blended effect.
Decoupage Tin Cans Great Home Decor
Now that you know how to make decoupage tin cans, it’s time to get creative! Upcycling old cans into stunning decor pieces is fun, easy, and eco-friendly. So grab your materials and start crafting today!
Share your finished designs on social media and inspire others to recycle with style! 🎨♻️
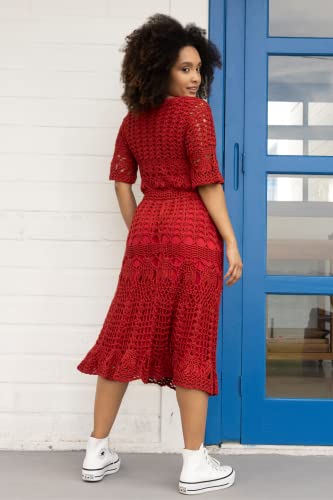
Viscose yarn, often called rayon, is a semi-synthetic material that has gained popularity in the textile industry. Derived from natural materials like wood pulp, it offers a balance between natural fibers and synthetic alternatives. This article will explore what viscose yarn is, its production process, unique qualities, and why it’s a perfect choice for various applications.
Viscose is a type of rayon made from cellulose fibers extracted from wood pulp. It is considered a semi-synthetic material because it is derived from natural sources but undergoes significant chemical treatment. The result is a fiber that has a silky feel, high absorbency, and a beautiful drape, making it a popular choice in the textile industry.
The History of Viscose
Viscose was first manufactured in the late 19th century as an alternative to silk. The first patent for the production of artificial silk was granted in 1855 to George Audemars, but it wasn't until 1892 that British scientists Charles Cross, Edward Bevan, and Clayton Beadle developed the modern viscose process. By the early 20th century, viscose rayon became widely available, revolutionizing the textile industry by offering an affordable, high-quality alternative to silk.
The Manufacturing Process of Viscose Yarn
The production process of viscose involves several steps that transform raw material into soft, flexible yarn:
Cellulose Extraction – Wood chips from trees such as spruce, pine, and beech are processed to extract pure cellulose fibers.
Alkaline Treatment – The cellulose is treated with sodium hydroxide (caustic soda) to form alkali cellulose.
Xanthation Process – The alkali cellulose reacts with carbon disulfide to create cellulose xanthate, a viscous organic liquid.
Dissolution – The cellulose xanthate is dissolved in a diluted caustic soda solution to form a thick viscose solution.
Spinning – This solution is extruded through spinnerets into an acid bath, regenerating the cellulose fibers into thread form.
Final Processing – The fibers are washed, stretched, and cut into desired lengths, resulting in the finished product ready for use.
Step-by-Step Production Process
Step
Process
Key Elements
1
Cellulose Extraction
Wood chips from spruce, pine, and beech trees are processed to extract pure cellulose fibers.
2
Alkaline Treatment
Sodium hydroxide (caustic soda) is used to create alkali cellulose.
3
Xanthation Process
Alkali cellulose reacts with carbon disulfide, forming cellulose xanthate, a viscous organic liquid.
4
Dissolution
The xanthate dissolves in a diluted caustic soda solution, creating a thick viscose solution.
5
Spinning
The solution is extruded through spinnerets into an acid bath, regenerating cellulose fibers.
6
Final Processing
Fibers are washed, stretched, and cut, creating the final product ready for use.
Machinery and Timeframes in Production
Pulper Machines: Used for breaking down wood pulp into a usable cellulose fiber.
Mixing Tanks: Combine cellulose with chemicals to create a homogeneous mixture.
Aging Chambers: The viscose solution rests for several hours to achieve the right consistency.
Spinnerets: These specialized nozzles extrude the viscose solution into fine fibers.
Drying and Curing Machines: Used in the final stage to strengthen and stabilize the fiber.
The entire manufacturing process can take anywhere from a few days to a couple of weeks, depending on the desired quality and end use of the fabric.
Unique Qualities of Viscose Yarn
Viscose fiber is known for several desirable characteristics:
Soft and Silky Appearance – Viscose fabric closely resembles artificial silk due to its smooth and luxurious texture.
High Absorbency – With excellent moisture regain properties, it keeps the wearer cool and comfortable.
Beautiful Drape – The fabric flows effortlessly, making it ideal for elegant clothing like dresses and blouses.
Breathability – Its porous structure allows for better air circulation, making it perfect for warm climates.
Vibrant Colors – The fabric absorbs dyes well, resulting in rich and deep colors, even in dark colors.
Affordable Alternative – Compared to pure natural fibers like cotton fibers or silk, viscose is more cost-effective while maintaining a similar aesthetic appeal.
Quality
Description
Soft & Silky
Resembles artificial silk due to its smooth texture.
High Absorbency
Excellent moisture regain properties for comfort.
Beautiful Drape
Flows effortlessly, perfect for elegant clothing.
Breathable
Porous structure allows for better air circulation.
Vibrant Colors
Absorbs dyes well, providing deep and rich colors.
Affordable Alternative
Less expensive than silk but offers similar aesthetic appeal.
Environmental Impact and Sustainability of Viscose Production
While viscose comes from renewable resources, its production process raises some environmental concerns:
Water Use and Energy Use – The process requires a large amount of water and energy, contributing to its environmental footprint.
Chemical Treatment – Harmful substances like carbon disulfide and caustic soda are used, leading to pollution risks if not properly managed.
Deforestation – As a plant fiber, viscose relies on wood pulp, leading to concerns over sustainable sourcing from natural resources.
Sustainable Alternatives
Eco-conscious brands are now adopting sustainable fabrics like modal and lyocell, which are improved versions of viscose with less environmental impact. These alternatives use a closed-loop system that recycles water and chemicals. Brands such as Lenzing’s TENCEL™ have introduced eco-friendly viscose materials.
Sustainable Alternative
Benefits
Lyocell (TENCEL™)
Uses a closed-loop system to recycle water and chemicals.
Modal
Requires less water and chemicals, making it more eco-friendly.
Bamboo Viscose
Made from fast-growing bamboo, reducing deforestation impact.
Common Uses of Viscose Yarn in the Textile Industry
Viscose fabric is widely used in various sectors, including:
Fashion Industry – Viscose thread is found in tops, dresses, trousers, and skirts.
Home Textiles – Used in bedding, curtains, upholstery, and even the manufacture of sponges.
Medical Textiles – Some surgical textiles and wipes use viscose due to its high absorbency.
Blended Fabrics – Often combined with cotton, polyester yarns, and metallic threads for improved durability and texture.
Cable Knit Jumpers – Offers softness and elasticity, making it beginner-friendly kits for knitting projects.
Industry
Application
Fashion
Dresses, tops, trousers, skirts, and activewear.
Home Textiles
Bedding, curtains, upholstery, and the manufacture of sponges.
Medical Textiles
Some surgical textiles and wipes due to high absorbency.
Blended Fabrics
Combined with cotton, polyester, and metallic threads for durability.
Knitwear
Used in soft yarn for sweaters, scarves, and baby clothes.
Comparison with Other Fibers
Property
Viscose
Cotton
Polyester
Silk
Texture
Soft, silky
Soft, breathable
Smooth, synthetic
Luxurious, natural
Absorbency
High
High
Low
Moderate
Durability
Moderate
High
Very high
Moderate
Sustainability
Moderate
Renewable but water-intensive
Low, made from petroleum
High but expensive
Future of Viscose
The textile industry is innovating to make viscose more sustainable. Research is focused on:
Bio-based solvents to reduce chemical waste.
Better tree management practices to prevent deforestation.
Improved recycling techniques for reusing viscose fibers.
DIY Uses of Viscose Yarn
For craft lovers, viscose is a great material for:
Knitting & Crochet – Lightweight scarves, sweaters, and baby clothes.
Sewing Projects – Flowy dresses, skirts, and pajamas.
Home Décor – Cushion covers and table runners.
How to Choose the Best Quality Viscose Products
When selecting viscose garments, consider these factors:
Yarn Label – Always check the label for a carefully selected mix of fibers to ensure good quality.
Fabric Weight & Drape – Lighter viscose fabric has a more beautiful drape, while heavier versions are better for structured garments.
Washing Machine Care – Viscose is delicate, so washing in cold water is recommended to maintain its shape.
Return Policy & Privacy Policy – If shopping online, ensure the retailer has a reliable return policy in case the fabric doesn’t meet your expectations.
Why Viscose is a Popular Choice in Recent Years
Viscose production has evolved to meet the demands of consumers looking for comfortable, stylish, and affordable clothing. With its unique form of wood cellulose acetate, viscose has become more common in the fashion world, providing a balance between natural fibers and synthetic fibers. The huge demand for viscose is driven by its ability to offer the best results in terms of feel, appearance, and versatility.
International Business and Shipping of Viscose Products
For those looking to buy viscose material internationally, various manufacturers offer international shipping. European orders typically arrive within 3-5 business days, while shipping times to the United States, South Korea, Cape Verde, St. Kitts & Nevis, and St. Vincent may vary based on the supplier’s strong network of logistics.
Viscose Yarn - Silk Like Fabric
Viscose yarn is a perfect choice for those seeking a fabric with a silky feel, beautiful drape, and vibrant color retention. As a semi-synthetic material, it bridges the gap between natural yarn and man-made fibers, offering a versatile option for the textile industry. While it has environmental concerns, more sustainable practices in viscose production are emerging, making it a responsible and stylish choice for consumers.
Whether you’re looking for soft yarn for a cable knit jumper or sustainable fabrics for elegant clothing, viscose remains a reliable and aesthetically appealing option.
Note: This post contain
affiliate links. If you purchase through these links, I earn a
small commission at no extra cost to you.
Are you ready to elevate your accessory game with a stunning handmade project? Whether you're a seasoned crafter or a total beginner, this DIY Leather Earrings with Copper Hoops tutorial is the perfect creative outlet.
In this easy-to-follow guide, you’ll learn how to make leather earrings that blend the rustic charm of copper hoops with the sleek sophistication of genuine or faux leather. And to make things even easier, we’re including a FREE printable PDF pattern you can download, print, and use right away.
These lightweight, stylish earrings are perfect for gifting or keeping for yourself. They add a pop of elegance to any outfit—and once you make one pair, you’ll want to create them in every color and style.
Let’s dive in!
Why DIY Leather Earrings Are the Perfect Project
✅ Beginner-Friendly: Minimal tools and skills required
✅ Affordable: Use scrap leather and inexpensive copper hoops
✅ Customizable: Pick your favorite colors, shapes, and textures
✅ Lightweight & Comfortable: No sore ears from heavy earrings!
✅ Eco-Friendly: Repurpose old leather scraps or upcycle
✅ Trendy & Stylish: Handmade jewelry that stands out
✅ Perfect Gift: Great for birthdays, holidays, and more
Step-By-Step Tutorial: DIY Leather Earrings with Copper Hoops
Step 1: Download & Print the Pattern
Start by downloading the free PDF leather earring pattern. Print it out on standard printer paper or cardstock for durability.
Step 2: Choose & Prepare Your Leather
Select a leather piece that suits your style. Soft to medium-weight leather works best. Faux leather also works if you prefer a vegan option.
Pro tip: Use metallic, embossed, or printed leather for a modern look!
Place the leather flat on your cutting mat, smooth side facing down.
Step 3: Trace the Pattern onto Leather
Cut out the paper pattern you want to use, then place it on your leather.
Trace the pattern lightly using chalk or a silver pen so it’s visible but not permanent.
Step 4: Cut Out Your Leather Shapes
Use sharp scissors or a craft knife to cut along your traced lines. Precision is key here—clean cuts make the earrings look professional.
For fringe or intricate designs, a craft knife may give you better control.
Cut 4 pieces and glue them together to create two double-sided earrings
Step 6: Make your own jump rings and hoops
Make your own jump rings or use already made ones
Coil the wire tightly around your mandrel or round pliers , as shown.
carefully line the flush side of your cutters up with the first cut, and complete your second cut.. This ensures that your jump ring is exactly the right size and that both cut ends of the ring are clean, flush cuts. Those nice square ends will then allow your jump ring to close neatly without a visible gap.
Step 5: Punch Holes in the Leather
Use a leather hole punch or awl to create holes where you’ll attach the leather to the copper hoop and where the earring hook will go.
Step 7: Assemble the Leather & Copper Hoops
Through the holes, thread the jump rings
and through the jump rings, thread the hoop
Step 7: Attach the Earring Hooks
Using jewelry pliers, open the loop on the earring hook, slide the copper hoop onto it, and close the loop securely.
Be sure the earrings are balanced so they hang correctly.
Step 8: Add Finishing Touches
Trim any uneven edges
Add beads, charms, or tassels
Use metallic paint to add accents
Burnish the edges of real leather for a polished finish
10+ Creative Variations for Leather Hoop Earrings
Layered Look: Use two or more leather pieces with different lengths
Mixed Metals: Combine copper with brass or silver hoops
Boho Fringe: Add fringe layers hanging from the hoop
Stamped Leather: Use leather stamps for personalized designs
Painted Designs: Hand-paint abstract patterns or monograms
Feathers + Hoops: Leather feather cutouts dangling from hoops
Beaded Hoops: Add small beads along the copper hoop
Braided Leather: Braid thin leather strips around the hoop
Geometric Shapes: Triangles, diamonds, and squares
Layering with Fabric: Combine leather with fabric or lace
Mini Hoops: Create small, delicate hoop earrings for a minimalist style
Tips for Working with Leather in Jewelry Projects
Always test cuts and punches on scrap leather first
Use sharp scissors and knives for clean cuts
Condition real leather to keep it soft and prevent cracking
Faux leather can sometimes fray—seal the edges with a lighter or glue
Choose hypoallergenic earring hooks for sensitive ears
If your leather is too stiff, gently roll it to soften it up
Don’t over-glue—less is more, and prevents messiness
Balance is key: make sure your earrings are symmetrical and hang evenly
How to Care for Your DIY Leather Earrings
Cleaning:
Wipe gently with a soft, dry cloth
Avoid water and chemicals
For real leather, occasionally use a leather conditioner
Storing:
Hang them or lay flat
Keep out of direct sunlight
Store away from moisture to prevent tarnish on the copper
FAQs about DIY Leather Earrings with Copper Hoops
What kind of leather is best?
Soft to medium-weight leather or faux leather is ideal. Avoid thick leather unless you’re making oversized statement earrings.
Where can I buy copper hoops?
Check craft stores, jewelry supply shops, or online marketplaces like Etsy or Amazon. You can also make hoops from copper wire!
What size hoop is best?
1.5” to 2” hoops are the most common for earrings, but you can use larger or smaller depending on your style.
Can I use glue instead of rivets?
Yes! Strong glue like E6000 works well, but always test on a scrap first to ensure it adheres properly.
How do I stop faux leather from fraying?
Seal edges with a thin layer of clear glue or carefully melt them with a lighter.
Troubleshooting Common Leather Earring Problems
Problem: Uneven cuts
Solution: Use a sharp craft knife and ruler for straight edges. Go slow and steady.
Problem: Earrings don’t hang evenly
Solution: Double-check hole placement. Both earrings should be symmetrical.
Problem: Copper hoops tarnish
Solution: Store them in an airtight bag. Clean with a jewelry polishing cloth.
Problem: Leather curls
Solution: Flatten under a heavy book overnight. You can also iron faux leather on low heat (with a cloth barrier)
Time to Show Off Your New DIY Leather Earrings!
Congratulations! You’ve just created a stylish pair of DIY Leather Earrings with Copper Hoops. Whether you’re gifting them, selling them on Etsy, or rocking them yourself, you can be proud of your handmade jewelry.
👉 Don’t forget to download your FREE PDF earring pattern here: Download Now
👉 Tag me on Instagram with your creations! #anielskaanieladiy
👉 Pin this tutorial for later and share it with your crafty friends!
Note: This post contain
affiliate links. If you purchase through these links, I earn a
small commission at no extra cost to you.


.PNG)
.PNG)
.PNG)
.PNG)
.PNG)
.PNG)
.PNG)
.PNG)
.PNG)
.PNG)
.PNG)
.PNG)
.PNG)
.PNG)
.PNG)
.PNG)
.PNG)
.PNG)
.PNG)
.PNG)
.PNG)
.PNG)
.PNG)
.PNG)
.PNG)
.png)
.png)
.png)
.PNG)
.JPG)
.JPG)
.JPG)

.png)
.png)
.JPG)
.JPG)
.png)
.JPG)
.JPG)
.png)
.JPG)
.png)
.jpeg)
.JPG)
.png)
.JPG)
.jpeg)
.jpeg)
.jpeg)
.heic)
.heic)
.heic)
.heic)
.heic)
.heic)
.heic)
.jpeg)
.jpeg)
.jpeg)
.png)
.png)
.png)
.png)


